Coordination is Key!

If you're an architect, you can build your own taco stand. What's not to love?

If you’re an architect, you can build your own taco stand. What’s not to love?

If you’re a housing fan in WildStar, chances are you are considering architecture as a trade. There’s good and bad news to go with this. The good news is architect is a fun profession and your house will always be full of the finest toilets Nexian materials can craft. The bad news is architecture is expensive, and occasionally difficult. The description at the trainer isn’t joking, this profession isn’t for the faint of heart. You will need materials from every gathering profession, which means either hitting up the commodities exchange or leveling an army of alt minions to farm for you. There’s also a third way, which I am currently using. That is to train yourself in multiple gathering professions first, stash away large quantities of materials, then retrain architect. Unlike most other MMOs I have played, when you swap professions you retain your skill level and recipes learned. There is a cost involved, so make sure you store enough raw materials so you don’t have to swap very often!

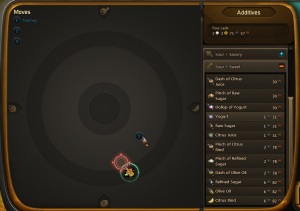
Architect uses the “coordinate crafting system,” which it shares with technologist and cooking. The screen grabs I’m showing here are all from cooking, since everyone can use it and since I’m currently in “gathering mode” stockpiling materials before I swap back to architect again. I hear lots of questions about how this crafting system works, so here’s a quick rundown.

The Basics

In coordinate crafting, recipes have a basic output as well as one or more “specials” which must be targeted to be crafted. This means if you just want the basic output all you need to do is gather the raw materials, open up the recipe and click “craft.”

Big reticule can mean a big chance to miss.

Big reticule can mean a big chance to miss.

To craft one of the “specials,” you need to target it on your diagram. You do this by adding up to 3* ingredients from the menu on the right. Your reticule begins in the center of the diagram (at the basic output) and you need to find the right group of ingredients to hit your target.

Discoveries

As you advance in your crafting, eventually your specials will not be immediately available. Instead you will have to discover them. One or more quarters will be shaded, indicating that there’s a discovery to be made there. You should aim for the middle initially, then zero in, following the arrows that will point you toward the discovery.

Tips and Tricks

Make sure you’re not mounted! Crafting in general tends to bug out if you attempt to craft anything while mounted.

The ingredients cost money, and more as you get into higher crafting tiers. Be prepared to spend a lot while you’re learning.

Check out your tech tree. By filling it out you’ll learn new recipes and eventually get talent points to spend.

Look at all your options. Sometimes it may be easier to go past a target and then come back from the other direction instead of going in a straight line. Open up the various sections of ingredients to make sure you’re not missing one that gets you where you want to be.

The reticule shows the POSSIBLE placement area. Just because you hit your target with a large reticule doesn’t mean you’ll definitely craft the special you were aiming for. Use ingredients with large reticules first, then zero in with more accurate ones to make sure you hit your target!

Get those talent points. All coordinate crafting professions/hobbies have talents that will make it easier to hit targets or make discoveries.

Mouseover those little arrows when you’re trying to make a discovery. The rollover text will tell you if you were close to hitting the target or not!

Keep lots of mats on hand when you’re trying to make a discovery. The arrows pointing you the right way will not stay after you logout, so make sure you have enough mats to zero in on your target before you have to stop crafting!

Mouseover the little arrows to see how close you were to hitting the target!

Mouseover the little arrows to see how close you were to hitting the target!

Final Thoughts

Be prepared to miss a lot, coordinate crafting has a lot of randomness to it. Once you get the hang of it, though, it is incredibly fun and engaging! I hope this has been helpful. Feel free to bug me in the comments on on Twitter if you have more questions!

*this can be increased by talents in cooking

Housing 101 – Housing Resources

Howdy friends! This week’s Housing 101 is less of a how-to and more of a where-to. I want to briefly discuss some great resources that I’ve been using for my housing needs.

First up is the ever-useful Jabbithole. This database-style site is angling to be your one-stop shop for finding out where things are on Nexus. The site is still a work-in progress on some fronts, so if you think it is useful and want to help out you can download the client and contribute data to help them improve!

Where can I get a rowsdower plushie? Check Living in WildStar!

Where can I get a rowsdower plushie? Check Living in WildStar!

Next on the list is Living in WildStar. I can’t say enough wonderful things about this site. The focus is just housing-related, and at this point I can’t live without it. Does the housing vendor sell something I can use to make a rope-swing? Check Living in WildStar. What does this decor I can craft look like before I waste mats on it? Check Living in WildStar. Which challenges have decor or FABkits as rewards? Again, Living in WildStar. Seriously go bookmark this site right now, I’ll still be here when you get back.

Finally we have a great blog with lots of addon reviews – To Boldly Nerd. Kadomi does an amazing job explaining how to use addons in WildStar and curating a list of really useful ones. I always find something useful when I stop by.

I’m going to leave you with a couple specific housing-related addons that I highly recommend.

The Visitor – When you’re at your house, this addon allows you to type someone’s character name in a search box and will teleport you to their house if it is public. No more hoping that the public house list happens to give you the cool house you visited last week.

Item Preview Improved – Does what it says – improves item preview. Now you can preview decor items that are on the auction house! This one is also great for fashion, since it lets you preview items that are not your armor type (but can still be used for costumes!).

Housing Decor Set Manager – I know I’ve mentioned this one before, but it is worth saying again. This addon allows you to take a “snapshot” of the decor you’ve placed at your house. This lets you remodel without fear, since this addon will place everything back just the way it was. Knowing that I can save my decor placement makes me much bolder in making changes at my house, since I can always “undo” by going back to a saved set with this addon!

That’s it for today. Have housing questions or suggestions for helpful websites or addons? Leave them in the comments!

Housing 101 – FABulous

A common question from people who are new to WildStar’s housing is “what are FABkits and how do I use them?” So today Gracie’s here to answer your FABkit questions and help spruce up your housing plot.

Meteor Crater FABkit in action

Meteor Crater FABkit in action

FABkits are in-game items that mysteriously package all the ingredients for a fancy home improvement into a handy, inventory-friendly box. These kits can be earned from challenges, drop from enemies, and can be crafted by experienced Architects. Of course they can also be found on the Auction House as well.

The plot improvements or “plugs” that they contain can range from cosmetic to functional in a variety of flavors. Cosmetic-only FABkits are things like the low-level Meteor Crater kit, which, as advertised, places a crashed meteor on your lawn. These type of kits make your house look cool, but don’t do much else. Similar to these are the biome-type kits, which bring a little piece of your favorite zones back to your yard. These may be slightly more complex than solely cosmetic ones, and often include a handy portal to send you back to that zone. Strictly functional kits, such as the vendorbot, crafting station, or raid portals allow some convenience in trade for taking up some of your real estate.

The menu listing will often tell you if the plug includes a challenge

The menu listing will often tell you if the plug includes a challenge

Challenge-containing kits, such as Shardspire Canyon (obtained by completing specific challenges in Algoroc or Celestion), bring additional gameplay to your housing plot. The challenges available range from simple to frustrating, and usually reward some choices of decor, dyes, or renown. In addition to the challenges, there are also FABkits that contain portals to mini-dungeons. These scale based on the number of people in your group, take between 20-40 minutes to complete and provide you with a reward such as fancy decor at the end. Finally there are resource-generating kits. These give you a small plot that will spawn crafting materials or consumables so you don’t have to brave the wilderness to obtain those goods. Garden plots fall into this category as well, although instead of randomly generating resources you will need to provide seeds for the plants you want to grow.

So now that you know what FABkits are, how do you use them? Once you’ve got a FABkit in your inventory, you can head to your house to decide where to use it. Open up your landscape menu. By clicking on one of the 6 “sockets” around your house you will bring up a list of all the potential “plugs” that can fit there. Anything that you have a FABkit for (or is part of the default options like the moonshiner cabin!) will be highlighted. Your kit may fit into either one of the small or large sockets, so if you don’t see it listed make sure to check the other size. Once you know which sockets are available you can choose the one that you want to use and build your kit!

Now some tricky bits and words of caution. FABkits can only be used once. Unlike decor, you can’t just pick them up and put them down someplace else. If you choose to remove a plug once it is already in place, you’ll have to obtain another FABkit for it if you change your mind later. Another thing to keep in mind is that most functional plugs require some sort of weekly upkeep. Generally it costs a few gold to “repair” your plug after a week of use, and these costs increase with the level and complexity of the plug. If you choose not to repair, the plug will remain on your land and look the same but you will not be able to use any functionality it may have had. This means if you can’t afford to repair today don’t sweat it, your plug won’t disappear and you can fix it up later when you are ready! The need to repair is one of the main sources of confusion for new folks, since the indicator is a subtle “wrench” icon on the socket on your landscape menu. If you try to use your crafting station and it isn’t working, check to be sure it doesn’t need repairs before you submit a ticket!

That’s your lesson for this week. Now you should be a pro at using FABkits and making sure the sockets in your yard are tailored to your specific needs! If you have a housing-related question feel free to ask in the comments. I’m always looking for more future Housing 101 lessons!

Housing 101 – Double or Nothin’

Welcome back to another installment of my Housing 101 series! At this point you’ve already dipped into the advanced tools so maybe you’ve graduated to 102 level. In any case, like a creepy bad movie, today we’re going to explore the magical powers of children and clones.

From-scratch rowsdower stables.

From-scratch rowsdower stables.

Building complicated structures or set pieces at your house can often require using multiples of the same item as building blocks. Maybe you’ve moved and scaled a wall just the way you want it, but now you need a few more wall sections to finish off the room. You could place them by hand, but I know from experience that it is almost impossible to get things positioned and scaled exactly the same every time. Instead, why not just make some clones?

Once you have your first piece all placed, select it and open the advanced controls. At the bottom, you’ll see a “Copy Transform” button. Before you hit it, you’ll want to select the radio buttons beneath it. These 3 buttons from left to right toggle the Position, Rotation, and Scale of the object (in that order). Choose which attributes you want to copy, or select all 3 for an exact duplicate placed in the exact same spot.

Double check you've clicked those 3 radio buttons if you want an exact copy!

Double check you’ve clicked those 3 radio buttons if you want an exact copy!

After you’ve copied the transform, escape out of the controls so you don’t accidentally mess with your first piece. Then open your crate and place your second object anywhere you like. Open the advanced controls back up and hit the “Paste Transform” button and you’re all set! As far as I can see, you have to recopy the transform every time you want to apply it to a new piece, but otherwise it is quick and painless to make a whole army of giant lopp plushies, or whatever else your heart desires!

I’ll also note that you don’t have to make exact clones. You can copy the transform from one object and paste it onto a completely different object. This way you can match the rotation and placement of an angled wall to be sure the window you hang there is rotated the same way!

The second part of today’s lesson is about children. Nope, teaching you about the birds and buzzbings isn’t in Gracie’s job description, just house construction! In the screenshot here you can see I’ve set up my bed with some plushies on it. Because of the way I positioned things with the advanced controls, if I decided to redecorate and move my bed, I’d have to reposition all the plushies too. Lucky for me, I can turn those plushies into “children” instead. Even better, we don’t even need to use the advanced controls to do it!

Glue those plushies to the bed!

Glue those plushies to the bed!

I can simply select each plushie, click the link to parent button, then click on the bed. Now all my little fluffy animals will move right along when I slide my bed to the other side of my bedroom! If you’ve linked things and decide to change them up later, you can unlink from parent individually, or to clear everything at once you can select the parent object and click “unlink all children.” This process makes moving groups of objects a breeze instead of a nightmare.

That’s it for today’s lesson. We’re drawing close to the end of my lesson plan for Housing 101 now. If there’s anything you would like me to cover please leave a comment and let me know!

Housing 101- Advanced Training

Well Howdy folks! I get the sense that this is a guide that people have really been waiting for, so without further ado I give you: The Advanced Tools.

A refreshing challenge

A refreshing challenge

Visiting a large number of houses that have been made public is a favorite hobby of mine. It is usually quite obvious which folks have figured out the advanced controls and which aren’t quite there yet. It is the difference between a cozy hideaway and a cozy hideaway at the top of a crazy jumping puzzle. Or between a quiet reading nook in your bedroom and an entire 2nd floor library. Curious how to work this magic? Let’s get to it!

If you’ve looked through my previous Housing 101 posts, you’ve hopefully had some practice placing objects. The default tools limit you to placing your decor on top of the ground or other objects. Time to break free from gravity! As an example I’ll show you this silly jumping puzzle I made during beta, out of beer signs and other random decor I had laying around my crate. (Those beer signs are a possible reward from making moonshine. Just sayin’).

First things first: Make sure you’ve toggled edit mode on! The game should turn it on by default when you open your crate, but double check! Then open the crate and place your chosen object down on the ground. That way we can close the crate and free up some screen real estate to make life easier. Select the object, and then choose to open the Advance Menu. Yikes. It looks a bit intimidating, but there’s only a few things you need to know to make some fancy upgrades to your house.

Make friends with the advanced tools!

Make friends with the advanced tools!

One of the first things that may grab your attention from this menu are the brightly colored arrows. The straight arrows adjust the x, y, and z position of the object in space, while the curved ones allow you to control the roll, pitch and yaw. Those 3 fancy words mean the amount the object is rotated on each axis of the 3 dimensions. By using the big green arrows at the top you can move things in mid-air and they will stay, solid as a rock. You’ve bested gravity!

You’ll note that all of the arrows have a small part and a larger part. These will move or rotate your object in smaller or larger increments. So use the big arrow to get close to how you want things to look, then switch to the smaller one to fine tune. The numbers for coordinates as well as roll, pitch and yaw can also be edited manually, if you really want a light touch or if you want to duplicate settings from another object.

Freeform adjustments

Freeform adjustments

The last important thing I want to touch on for today’s lesson is the Advanced Mode button near the bottom of the Advanced Controls. Toggling this will switch the on-object controls to include all 3 axes of rotation and movement. Doing this prevents you from just dragging the object around in the world. Instead, there’s a series of red, blue and green arrows that you can use to pull the object in one direction at a time. Lately I’ve been using this method almost exclusively, since it gives a ton of control without the complicated interface of the advanced menu. When moving things this way, you may still need to open the controls to hit the “Place” button and lock in your work.

The advanced controls really open up the possibilities of what you can do with housing, and for me, help turn WildStar’s housing from “fun diversion” into “all-consuming frenzied addiction.” I hope you have fun playing with these controls, let me know if you’ve made something you’re proud of! And if you happen to be Exile side, Evindra-NA, why not be neighbors with ol’ Gracie, and come visit Moonshine Mansion in game!

Housing 101 – Settle Down

Welcome back! It’s time for another housing lesson here at Moonshine Mansion. With headstart a matter of hours away, make sure you’re ready to fully take control of your shiny new home!

One word of warning before we begin, some of these screen shots were taken before some of the changes to the housing UI during ops week. Let’s start getting into the nitty-gritty of placing objects where you want them.

Place only the finest things in life!

Place only the finest things in life!

So you’ve got a fancy house, and maybe even a few “plugs” sprucing up your plot. But what about that treehouse you’ve always wanted? Or a loft bedroom in your house? You’re going to have to become good friends with the crate and the item placement controls. Here I’ll walk you step-by-step through the basic controls to get you started.

Step 1: Toggle Edit Mode. Remember our Housing 101 lesson 1? Ctrl + F5 or clicking on the cogwheel button on the housing action bar will allow you to place and edit your decor both inside and outside of your home. This bears repeating because it is still the #1 question being asked in the housing advice channel.

Step 2: Get cozy with your crate. Open up your crate and take a look at what you’ve got. If there’s nothing in there that tickles your fancy right now, you can also open the decor shop and buy something new. Purchasing from the decor shop will place the item straight into your crate. I’ve chosen a fancy weird spaceplant. Clicking it in your crate will show a preview of what it looks like, and once it is selected you can right click in the world to place it there. When it is set where you want it, click the “Place” button from your crate.

The Basics

The Basics

Step 3: Play! While you are still in edit mode, right-clicking on decor you have placed will select it and give you some controls to play with. You can move an item by dragging it. The default behavior is that items will follow terrain and other items. This means you can drag that flower from the floor to the wall and it will turn sideways as you do so. Or you can drag it onto your table instead of the floor. I’m going to hang mine like a chandelier from the ceiling!

There’s a pair of green handles which will let you rotate the decor around until it is facing the way you like it. Clicking the “toggle prop options” blue button in the middle of the object will give you access to a couple more controls. There’s a slider bar which will allow you to resize your decor, or for very small changes you can use the two tiny arrow buttons on either side of the slider. The rightmost button under the item name will return the item to your crate if you decide you no longer want it. There are also buttons for opening the advanced controls, and for linking “children” to allow editing multiple items at once. I’ll be explaining these controls in an upcoming post!

Slightly more advanced.

Slightly more advanced.

Gracie’s Secret: I always “Place” an item right away without making any changes to it. Once it is down I can resize and move it without the Crate window being in the way. When I’m happy with it I can open the Advanced menu and hit the place button to make it stick.

Take some time placing things around your house until you’re comfortable with the way the system works. If you get brave, toggle the advanced controls and take a look at them. I’ll be walking you through what they do in the next installment!

Housing 101 – Make it Work

Lesson 2: Making Your House Work for You

Kicking up Some Dust

Kicking up Some Dust

You’ve got all this land, ripped freshly from the face of Nexus and flung into the air at great expense for your enjoyment. The sky’s the limit! What will you do? Well, while you’re drawing up your plans for your dream home, why not put that empty land to work? There’s 4 small and 2 large “sockets” on your property that can be filled with different “plugs” via purchases or FABkits.

Why yes, that does say Moonshiner Cabin

Why yes, that does say Moonshiner Cabin

Some are just decorative, like a giant crashed meteor. These are nifty because they give the effect of a lot of decor with minimal effort on your part! Other enhancements can create plots that can be harvested by gatherers. There’s multiple tiers of mining, survival, relic hunter, etc. plots that can be used to supply your crafting needs. Even a garden, where you can plant those seeds you’ve been finding when you shoot plants out in the world. If you’re really into crafting and just can’t wait until you get to a city to use a workbench, you can also place a crafting kiosk of your very own.

Additionally, there are enhancements that let you complete challenges, and even some that give access to unique 1-5 person instances with short dungeon-like content. At the highest levels, you can even have a portal to drop you off at a raid entrance! I am particularly fond of the challenges that you can have on your property. Not just because one of them lets you make your own moonshine. These challenges almost always have unique decor or dyes as rewards. Some also can give renown, which I immediately turn around and spend on more housing decor!

Plushie!!!!

Plushie!!!!

So set up a farm, a mine, or even a party full of adorable lopps that want you to smoke their hookahs full of unknown drugs. Whatever you decide, it’ll make your land look more lived-in and maybe put some coins in your pocket too!

Edit: Looks like I botched the scheduling and accidentally put this up a day early. Whoops! Newbie Blogger mistake ahoy!

Housing 101 – First Steps

So you’d like to become a homeowner, huh? Well lucky for you it is truly simple on Nexus, as long as you don’t mind that your home will be floating far above the ground! This guide will get you up and running as quick as can be.

Where and When?

This tram looks like a tardigrade

This tram looks like a tardigrade

Housing unlocks as soon as you reach level 14. Just haul your carcass toward your major city quick as can be. Once you’re there, you’ll find a Protostar housing specialist who will point you in the right direction. If you don’t find your way to the housing display on your own, you can even snag a tram ride straight there! A short quest later and you’ll be standing on your new front lawn.

Looks a little lonely...

Looks a little lonely…

Now What?

You’ll have to come up with a name for your property. Don’t stress too much, you can rename it later if you choose (Protostar_voice: *for money*). You’ll also get to choose between 2 decor packs with some basic furnishings. By the time you’re 14 you may have already found some housing decor or FABkits from questing or challenges. Right-clicking on decor in your inventory will transfer it to your crate. The crate is where all of your “stuff” gets stored until you place it in or around your home. We’ll get to that soon, but first let’s build a house!

Tools of the trade

Tools of the trade

When you are at your housing plot, you’ll get an extra action bar with 6 icons on it. The first is “Landscape”. This interface lets you add pre-formed kits to your land. More importantly, the big blue square in the middle lets you choose your house. There’s only a couple options to begin with, depending on your faction. I will say that for the exiles, the Cozy Aurin House has an extra little room in it compared to the other two choices.

The second icon on the housing action bar is “Remodel.” From this panel you can change the look of your house, both interior and exterior. This includes things like floors, roof, wallpaper, and even your sky. The interface changes slightly depending on if you are inside or outside of the house.

The third icon is “Crate.” This is where all of your decor items are stored when they’re not out making your house look awesome. Selecting an item from the list allows you to see a preview, and once you are in edit mode, you can right click in the world to place your item.

The fourth icon is “Vendor.” This one is dangerous! Here you can directly purchase a wide variety of decor items for your home. Costs can be either in gold or in renown. Gold is obtained in the usual way via questing, killing stuff, selling goods, etc., while renown is gain from doing group activities or as rewards from things like completing challenges.

The fifth icon, “Toggle Edit Mode,”  is quite important. You need to toggle this on before you can start placing or moving decor on your property. Not knowing this has been a source of frustration to a lot of new homeowners, so don’t forget about it!

The final icon, “Escape,” returns you to the entrance pad to your property. This is handy if you get stuck anywhere at your home.

Much more cozy

Much more cozy

Well, this covers the very basics! I’ll be back again soon with some more details about placing decor, some tips and tricks, and information about the advanced tools! Until then, let me know what you think if you get a chance to check out the housing in WildStar’s open beta, now until May 18, 2014.